Wednesday, August 8, 2012

baby, it's cool inside.

In the last post I wrote, I talked about how we updated our 1970s windows to the current century.  When it was colder outside, it stayed warmer inside - we were pretty excited!  But then we remembered how miserable last summer was after we first moved in.  When we would go upstairs to the second floor, the temperature would literally change 15 degrees.  (For some reason there is a thermometer in the light switch in one of the upstairs bedrooms, so we have proof).  If it were 75 degrees downstairs, it could be 80-90 degrees upstairs thanks to the sun beating down on the roof all day.

Side note: Ever notice rooftops in the winter after it snows?  The houses with snow on their roof have properly insulated attics, meaning the insulation is keeping the heat in the house.  The houses without snow on them usually have poor insulation allowing the heat to escape through the roof and melt the snow. 

We remember from our home inspection that our attic had very little insulation - approximately four to six inches of old rock wool.  Not enough to actually insulate our house.  We toughed it out the first summer in our house.  We dreaded going upstairs to go to bed.  When we got two-thirds of the way up the staircase, we could feel the heat.  While it's a fact that heat rises, it's frustrating when you have the thermostat set at a certain degree and only half the house is actually that temperature.

So, in April, when it was nice and cool out (remember that?), we decided we would insulate our attic.  Ourselves.  Without experience.  First thing on the list was to find out how to actually get up to the attic.  The attic access is in a very small closet in one of the bedrooms.

Tiny closet, tiny access.
Beam me up. 
Below are pictures of what the attic looked like before.  Notice how the insulation does not even come up to the cross beams on the floor?  They are only six inches tall.


Below is a gap we found in the floor of the attic - it is the space between our bedroom wall and hall bathroom wall.  It could be contributing to the heat in our bedroom.  We ended up covering it and then covering it with insulation.


Attic and whole house fan. 
One of my favorite features in our house when it's nice and cool out. 

After scoping out our attic, it was time to get started.  We had to prepare the soffit vents.  These are the vents in the eaves outside of the house.  They help circulate heat in and out of the attic and you do NOT want to cover those up.  Here is a depiction of their purpose.


And here's what they looked like before adding the baffles. 


By using an old door that we removed, Ehren was able to get down into the eave to install the attic baffles using a staple gun.  He looooved this job.


He ended up putting in 20 baffles - this took a great deal of time and was pretty hot despite it being in the low 70s.  Next, I built a box to go around the whole house fan (the correct name for what most people call an "attic fan" - an attic fan circulates air through the attic only, not the whole house).  That way, insulation did not get on top of the fan and cause a mess elsewhere.

These C&B boxes have had a lot of life: wedding presents, moving, spray painting projects, and now WHF surround.


We decided to use Green Fiber for our insulation.  Not only is it "green", but if you buy 20 bags at Home Depot, you can rent the hopper (the hoppa'!) for free.  Attic insulation levels are measured in in R-values and we decided to go with about R-38 (as our inspector recommended).  The bags of Green Fiber have an estimating chart to determine how much you will need.  Since our attic is approximately 1,000 square feet, we needed 50 bags.  It took six carloads to bring the hoppa' and 50 bags home.  The hopper is break-your-back heavy, along with 100 feet of hose.  


The hoppa'!
That's a lot of fiber.
Luckily, the hose was long enough to go from our deck up to the second floor bedroom and through the attic without a problem.  This stuff is messy so keeping the hopper outside is absolutely required.


And finally, after hours of prepping, hauling, unloading, stressing, we were ready to start blowing it in. At eight o'clock at night.  Whoops.  Sorry neighbors.  Ehren was in the attic blowing and I was loading the hopper.  You have to break up the blocks of fiber to fit in the hopper which then fluffs it up and shoots it up the hose.  You can actually see shreds of newspaper and plastic in the fiber which is why it's so "green".  Here's what it looked like in the process.


So, picture this.  As I was loading the hopper, I noticed it was taking forever.  Like ten minutes a bag, forever.  Multiply that by 50 and you have 500 minutes, which means 8.33 hours, which means we wouldn't get done until 4:30 a.m.  It was going so slow I was looking up at the stars, texting my mom, checking facebook, yawning, etc., thinking, "this is going to take forever".  Meanwhile, Ehren is propped up on the attic beams watching the fiber sputter out of the hose, thinking "this is going to take forever."  So I thought something must be wrong.  I re-read the directions on the hopper and it said, "for attic insulation, make sure the gate is all the way open".  There was no obvious "gate".  So I looked around and saw a piece of metal sticking out, I pulled on it and nothing happened.  Then I pulled it harder and WHOOSH! the fiber was shooting through the hose at lightning speed (compared to before).  Then I'm thinking, OMG.  Panicking, I start grabbing more bags, breaking up the fiber as fast as I could, trying to keep up.  Meanwhile, Ehren's up in the attic thinking, "woah, it's really coming now!".

The best way to visualize this is to watch this clip of "I Love Lucy" (my all-time favorite show).  Instead of chocolate, it's attic insulation.  At first I'm taking my time then the sh** chocolate hits the attic fan and I'm panicking, shoving insulation in my shirt, my hat and my mouth.  Okay, not really, but you get the idea.  Just watch.


So it went from ten minutes per bag to under one minute per bag.  Two and a half hours later, we were done.  It all seems like a blur now because it went so fast.  We used this walkie-talkie kind of app to communicate and it worked out great.


In the middle of the madness.
What a mess. 
We got done at about 11:00 p.m. and were exhausted.  Check out the the difference below.  The attic beams are long gone with 14 inches of insulation above them.

Oooh, fiber.

More than a couple servings of fiber.
Relieved to be done.
Foreshadowing to an older, greyer Ehren?
Exhausted.
Despite the goggles and mask, we had insulation everywhere.  Every.  Where.  We celebrated accomplishing our biggest DIO project by getting Pizza Shuttle.. duh.  

So, how about the numbers?  To have attic insulation put in by professionals, it would have cost us at least $1,200.00 for 1,000 square feet.  With all the supplies (baffles, insulation), we spent approximately $450.00 with a free hopper for the day.  We were excited about saving money by doing it ourselves, but the most exciting part was getting our electricity bill this summer.  Who gets excited about getting an electricity bill?  We do.  

July 2011 bill: $189.00
July 2012 bill: $101.00

Wow!  What is amazing is that this summer has been hotter and we've kept the house cooler than last year.  And while we didn't live here last June, our June bill this year was only $69.00.  My estimation is that in 2 to 3 more months, we will have paid off our insulation costs with the money we've saved in energy bills.  We've not only been excited about the money we're saving but also the difference we feel in the house.  Now, when we go upstairs, there is absolutely no temperature change.  Sometimes, it's even cooler in our room due to simply not being up there.  

This project was a lot of work but will provide years (and years) of energy savings.  Take a peek in your attic and see what you have.  You could be in the same situation we were in.  And if needed, I highly recommend you doing this, no experience required!  Just remember to open the gate.. all the way. 


Saturday, August 4, 2012

baby, it's hot outside.

Oh, how I wish I were singing "Baby, it's cold outside"... even though I hate that song and find it really disturbing.  (Dude, quit being a creeper and let her leave. Who cares if it's cold outside?).  But this is Kansas and the summers suck.  The humidity, chiggers, mosquitoes, and lack of rain have made us all a little cranky.  Since when does a slightly cooler than a desert "cold" front bring us 90+ degree weather?  It's funny how we acclimate to consistent 100+ weather, think it's normal and then get really excited when it's going to "only get up to the 90s today!"  Let's talk energy efficiency.

While I appreciate the changing seasons outside, I don't think you should be able to feel them inside your house.  Back in January, we replaced the remaining old windows in our house.  Let's just say they didn't believe in insulating around windows in the 70s.  In the winter, you could feel the draft in all the windows, especially the one in our bedroom.  Ehren, who sleeps closest to the window would freeze at night because of me hogging all the blankets the drafty window.  Replacing windows is a big investment but it's better than literally throwing expensive energy out the window.

Below, you can see the old windows.  All you can really see is screens, old metal, and windows that look somewhat small.  I feel like these windows really date our house.  The second floor windows each have two windows in them.


We used American Exteriors and highly, highly recommend them.  I went to work in the morning and came home at 4:00 p.m. and had 7 new windows.  No trace of the major project that occurred while I tortured poor innocent 90 year olds with exercise worked.  When I walked in the house, my mouth fell open.  I couldn't believe the difference it made - more glass, less wood and cross-bars, more light, better screens.

What we liked about American Exteriors:

  • Lifetime warranty that transfers to future home owners
  • Each window is customized down to 1/16th of an inch to fit each window perfectly
  • They hauled away the old windows
  • Less expensive than Pella, same or better quality
  • The guy who installed the windows has dogs just like Cozy

Our American Exteriors guy had a great way of explaining how windows are supposed to function: they either keep the heat IN or keep the heat OUT.  Obviously, in the winter, you don't want your heat to be escaping out the windows and heating the neighborhood.  And in the summer, you don't want heat coming into your house and making your AC work harder and longer.

Here's how the new windows looked after installation.  Big difference, huh?


As you can see in the picture, the 2nd floor windows are now single windows (they used to be double windows that opened up and down separately).  Now, to open the new windows, you slide them side-to-side.  It makes the window look much larger.  Plus, it's cheaper to have one big window instead of two small windows.

FYI: Windows are priced by adding [height + width] and is known as "united inches".  So, it's cheaper to do one large window instead of two smaller ones.


Example:
2 small windows:  [30(h) + 20(w)] + [30(h) + 20(w)] = 100 united inches
1 large window:  30(h) + 40(w) = 70 united inches


Before: master bedroom window
After: master bedroom window


Before: master bathroom


After: master bathroom
Before: guest bedroom
After: guest bedroom
Before: front living room
After: front living room
It's hard to take pictures of windows, but you get the idea.  More window, less clutter.  Lots of sunlight without the heat.  The windows were our biggest expense yet, but will retain value and save us in energy costs for years to come. 

We also replaced the old thermostat (circa 1976) with a new, fancy, programmable digital thermostat.  We thought about getting a regular digital one, but then we saw this one with wi-fi for the same price (about $100), did the "Tim the tool-man Taylor" grunt and got it instead.  Apparently my husband is a natural electrician and figured out how to set it up without electrocuting himself.  (I will not be explaining how to do this for obvious reasons). 


You may be asking, "why do you need wi-fi on your digital thermostat?"  Well, you can download a smartphone app (or go to the website) and access your thermostat from anywhere.  This has come in quite handy as evidenced by these examples:

Example 1:  We went to Maryland for a week, set the target temperature to 85 degrees to save energy.  When we were in Detroit for our layover, we got on the app to adjust the temperature to a nice and cool 72 degrees - it made hauling in our luggage and taking a nap much more pleasant. 

Example 2:  One of my friends is a home health PT in Lawrence and drives from house to house treating patients, sometimes she needs a place to heat up her lunch or access wi-fi.  We keep our house really cool in the winter and I know she hates the cold.  So, while I was at work, I cranked up the heat for her so it would be warmer when she got there.

Example 3:  Pure laziness.  Who wants to walk all the way downstairs to adjust the thermostat at night when you can do it from the comfort of your bed with a few taps of the finger?  Not us.  Or Cozy. 

Screen shot of our app. 

Just because I like before and after pictures, let's look at the difference between old and new windows:


While new windows and a thermostat aren't as exciting as a new headboard or revamped living room, it's necessary when you buy an older home.  You always hear that new windows will pay for themselves, and they're right!  The next post will be about how Ehren and I insulated our attic ourselves.. talk about a messy job!

P.S. I apologize for being a bad blogger, it's been a busy summer!


Tuesday, May 8, 2012

end table / up date

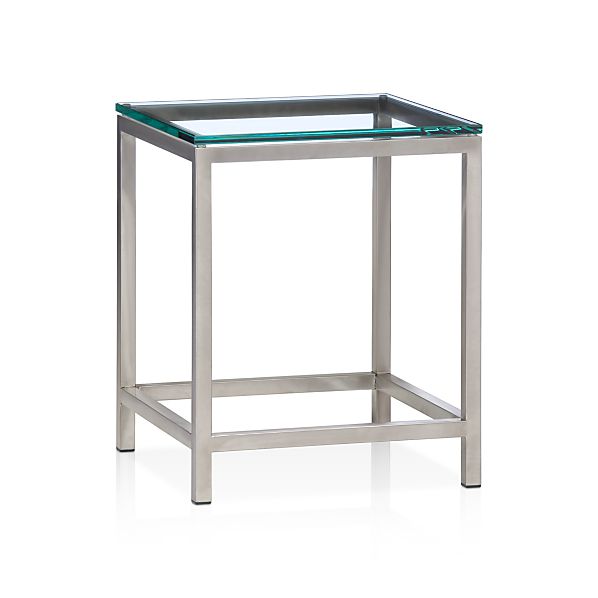
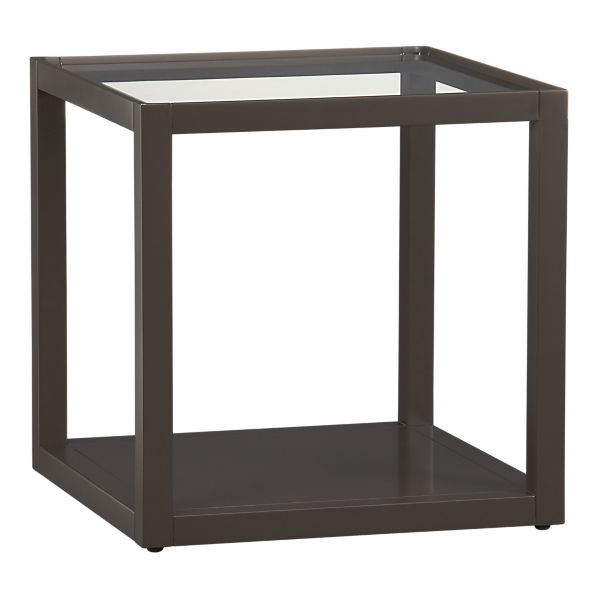
I spent months looking for end tables that would go with our newly updated, comfy, cozy living room.  I found some I liked but they were either too tall, too short, not the right color, or failed to make me excited about them.  I didn't want black end tables because our couch and love seat are black.  I wasn't crazy about white and wasn't a big fan of all glass.  Here are some that I liked...

Crate and Barrel: $399.  Too expensive.
Crate and Barrel: $79.95.  Too short. 
Target: $99.  Too much glass, too tall. 
While I can't make a decision about what I want to eat at a restaurant, (I have a reputation of holding up a dinner order when we go out to eat) I know exactly what I want when it comes to home decorating or renovating.  If I don't get overly excited about it or lay awake in bed at night thinking about it.. it's not "IT".  

Side story:  When Ehren and I went out to dinner to celebrate buying a house, he asked me, 
"do you know how you want to decorate our house or any projects you want to do?"  I told him I already knew what I wanted to do in every single room and proceeded to tell him... room by room.  All he could think of was dollar signs, I'm sure.  Then, two months later when we moved in, the projects began!

So, during one of our many trips to Home Depot, I checked out the Martha Stewart display that I had been eyeing.  She has a line of metallic and textured paints (bronze, copper, silver, dark silver, etc) that can be used on basically any surface.  I decided to get the dark silver, called "Thundercloud" and refinish the end tables we already had.  

I inherited these end tables from my parents when I went to college and I'm pretty sure they are older than me.  The "brown-ness" of these coffee tables in my black, white and grey living room was bothering me.  So, I busted out the sander and got to it!

Before. 


The brown... the horror!  Just kidding, but obviously they look out of place and outdated.  Cozy was in his usual spot.. on or near my current project.  DIY makes him so tired.   


Before sanding. 

After sanding. 
I sanded the end tables pretty quickly, mostly to rough them up and take away the slick finish.  I was going to prime them and primer sticks to almost anything so no need to sand perfectly or evenly.  


Then, after cleaning them off, I got out the primer that I used for some outdoor furniture I painted a while ago.  


After primer. 

Cozy was right there in the action.  Notice the paint on his ear?  And you guessed it, he got paint on his back, too. 


Let the painting begin!  The Martha Stewart paint is very thin and went a long way.  Isn't it purty?


After one coat of metallic paint. 

I made sure to do a good job with the first coat in case I wanted only one coat.  I actually liked the streakiness of the metallic paint because it had that distressed kind of look that my coffee table has if you remember from this post.  Plus, you can see the wood grain through the paint, which I also like.  If the paint was even and opaque, I think it would look more like it was spray painted and cheap.. even though this was by far the cheapest project I've done!

Final product.

Final product.

Streaky, distressedness.
Before.
After.

With the metallic paint being only about $5.50 and using only half of a container of it, this project costed me about $2.50.  It doesn't get any cheaper than that.  The plus side is that I got really excited about how the end tables turned out when I was done.  They fit in to the contemporary living room even though they were products of the 80s, like me.  What do you think?  It makes me want to refinish other pieces of furniture. 

the black plague, part III: front door

Now the black plague has moved to the front door.  While I think the "rustic" and "distressed" look has its place, I do...

Blog design by Get Polished | Copyright 2016